How to Draw a Closet in Plan
The process to plan, design and build a walk in closet is completely unlike than it is for a piece of stand alone wardrobe. Basically, y'all're building a configuration of square boxes and making it fit into an imperfect space that is almost definitely out of square, out of plum and non level. The more walls you incorporate into your configuration the more difficult it is. A single wall of built-ins is easier than a whole room. Yet, no affair how big your closet is or how many walls yous are incorporating into your design, there are always challenges when it comes time to install. If you brainstorm your project with that expectation, it makes a bit easier to cope with the frustration when you run into your challenges.
How to plan and design a walk in closet
How to plan and design a walk in closet
Yous tin can draw yous plans by hand or apply a estimator program which is very helpful when you're messing around with dozens of different pattern options for a single infinite. I use Sketch Up — which has a learning bend merely if yous spend a few hours looking, you can find some helpful YouTube videos.
1. Appraise your needs
Before you start cartoon up design options for your closet, consider everything you lot want to STORE in it and HOW you lot want to shop those items.
- Do you need more drawers or hanging storage?
- How long exercise your hanging storage areas need to exist?
- Do you demand to arrange storage for dresses, suits or long wintertime coats?
- Do you lot hang your slacks full length or draped over a dowel rod?
- Practice you like open shelving or do you adopt drawers?
- Do you lot curlicue your belts or hang them?
- Fold your ties?
- Need jewelry drawers with custom dividers?
Try to account for EVERYTHING yous want to shop and how you want to store them all. And then figure out what size you lot need to build each storage section based on the size of the items that will be stored them.I created this chart you can use to help with continue rails of your items and measurements.
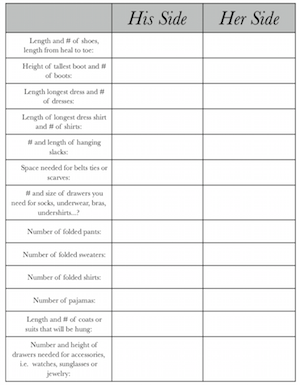
I've tried to include every bit many items every bit possible just included a blank 2d folio which you tin can customize to meet your specific needs.
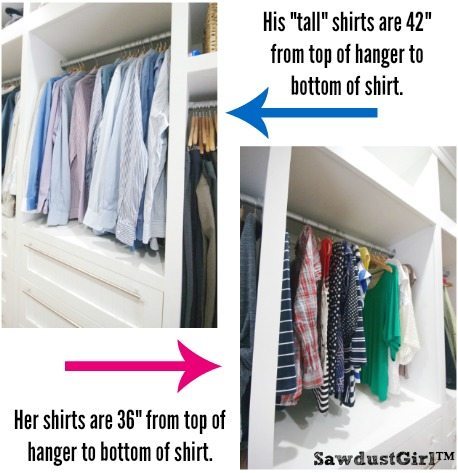
*When measuring hanging items, measure from top of hook in hanger to bottom of item.
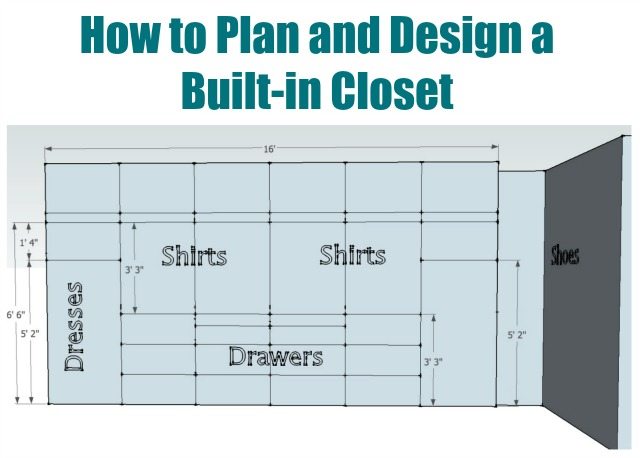
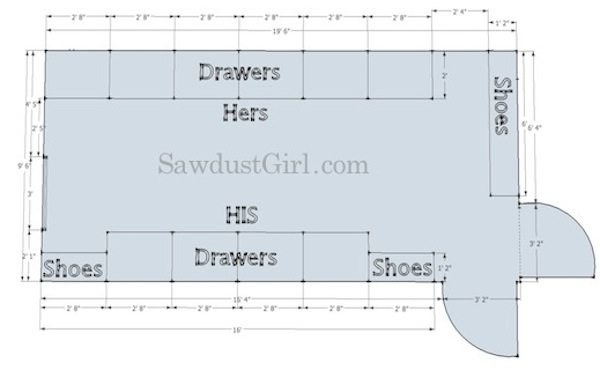
The photograph below indicates the measurements for my own primary closet and Wes and my shirts.
2. Measure your Room
The first thing to practise is get the dimensions of the room and draw upwardly a floorplan. Make note of where doors and windows are located as well as the location of outlets, light switches, air vents and annihilation else on the floor, walls or ceiling. Y'all don't want any surprises afterward y'all've already built everything!

Blueprint!
Now that know how yous want to store all the items you demand to store in your closet, yous can starting time designing the storage areas. Keeping in heed that I never build cabinets or built-in shelving wider than 32″ helps me figure out how many components will make up my built-ins.
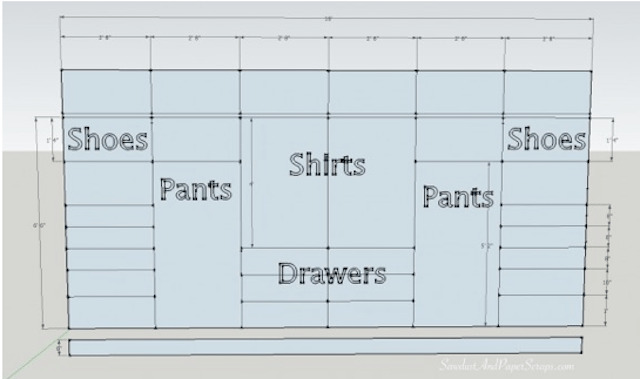
3. Create the overall program
On your floorplan, divide your closet design into logical sections and first creating pattern options. Come up up with equally many different configurations as possible so you can cull the best one for you lot. The best ane for you is the i that volition fit your specific needs and the one yous will be comfortable and happy to walk into every 24-hour interval!
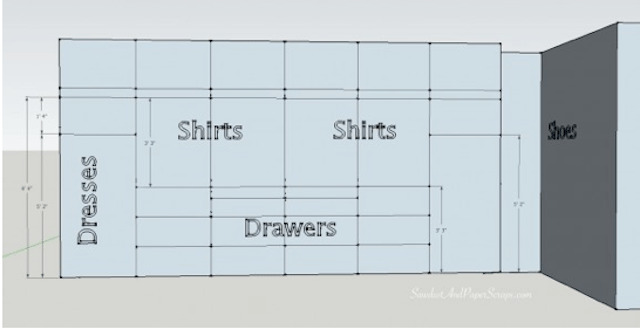
three. Design each section
Depending on the length of each wall, y'all will have decided how many separate built-in sections you lot will need to build. Now yous tin make up one's mind what office each section needs to perform. Depending on your needs, y'all may choose more drawers or shelves than hanging storage or visa versa.
Whenever I design, I endeavour to optimize every bit of space that I can while getting the expect that I want. Then, my principal focus is on how a space willfunction, then I effigy out how to make that look good.
*When planning hanging sections, don't forget to requite yourself extra room for the space needed above the hanging bar and then you can get your hangers on and off the bar! 3 or 4″ should do information technology.
Things to consider:
Convenience
When planning your built-ins, proceed in mind how loftier you can comfortable reach when deciding where to store the items yous use most. You probably don't want to have to grab a pace stool to accomplish your dress shirts is you wear them every day!
Toll
Besides, considerable cost is added when yous start adding hardware to your cupboard. Drawers are prissy for hiding what you are storing but they can be very expensive as can door hinges, drawer pulls and knobs. Open up shelving would be WAY less expensive than adding drawers. (Not to mention a heck of a lot easier to build!)
iv. Create your build plans
If you are building your built-in closet yourself, this would be the time to draw up yourbuild plans.
I create a programme for each cabinet in the congenital-in configuration making sure to label which chiffonier it is and what I intend to store in it. Writing lots of notes during the planning procedure is SUPER helpful. If you're like me, later on weeks and weeks of building, I sometimes forget what I was thinking when I started the whole process. Especially when I originally designed ten dissimilar possible blueprint options.
Afterwards I describe upwards plans for all my cabinets, I create a cut list so I can maximize my materials and get the to the lowest degree waste material possible.
Sometimes this ways going dorsum and making a whole bunch of changes to a whole bunch of plans.
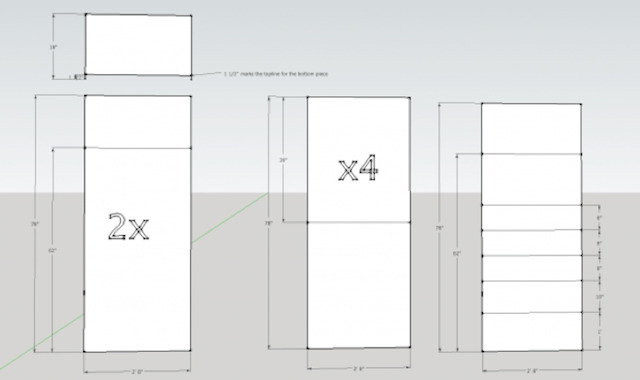
Maximizing materials
In the Elevation pictured beneath, I have a 6″ base that the cabinets will sit on top of. I did that to avoid wasting a 48″x12″ department on about 20 sheets of plywood for my closet! That's a lot of waste matter. Certain, I could probably take use information technology sometime in the future but that's a lot of scraps to store for who knows how long.
Just a bit of adjusting to my original design allowed me to use a separate half dozen″ base of operations instead of making the cabinets 6″ longer which gave me 18″ of leftover wood that I was able to use equally pieces in this build.
Of course, it isn't always possible to use every flake of material in your project but looking at all your options can salve you a flake of money if you are able to think creatively and are willing to take the extra time to look for options if you see that making small-scale adjustments to your design could salve y'all a considerable corporeality of money in materials.
Taping off, boxing upwardly, visualizing and gyre playing
Sometimes my clients call up I'k joking when I tell them to catch a gyre of painters record and create a pretend version of the room they want to create but I'm completely serious! Taping outlines of the built-ins yous are planning on building can requite you a experience for how the space will expect once the project is complete. If yous have whatever large moving boxes that's 90% better than record! Boxes fill the space vertically and so you lot will really get a "Feel" for the space once the cabinets are built. Employ tape or draw directly on the walls or boxes to show what each storage section is supposed to be. Can you comfortably become the hanger off that hanging bar? Can you reach the shelf where yous favorite jeans are stored? Etc…etc…
Information technology might feel funny to exercise it, but role playing in your brand believe cupboard could simply save y'all from making a terrible mistake that yous would not have noticed until the cabinets were built otherwise. Trust me…I know these things! 🙂
Build in Phases
Think at the starting time of this post when said to expect hiccups and hurdles? I e'er build and install in phases and then y'all can make adjustments to the next department to account for any shimming y'all had to practice to level and plumb your congenital-ins.
I generally take the overall design plan mapped out before I first building simply will wait to draw upwards build plans for the adjacent phase of cabinets until the first phase is installed. That saves me from having to redraw a whole section of plans because I need to remove 1″ from the overall design!
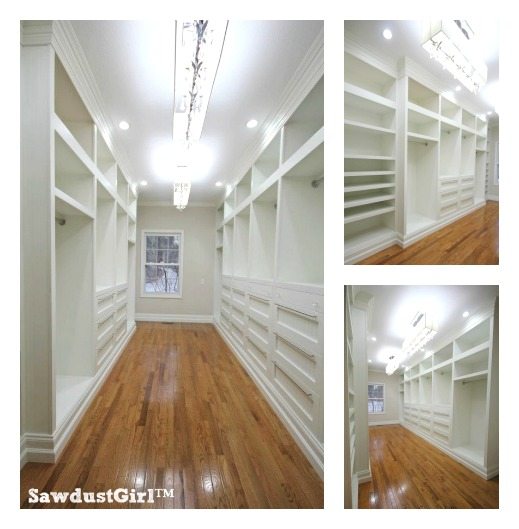
I hope you enjoy creating a functional congenital-in cupboard that is simply equally beautiful equally information technology is useful!
Now if you're planning on edifice your own wardrobe cabinets, check out all my cabinet building tutorials. I have lots of free tips and tutorials for building drawers and doors.
You can also purchase my Cabinet Building 101 eBook to aid you get started building the born closet of your dreams!
If you don't want to plan your own and just desire my Walk-In Closet Plans, you can purchase those also.
Source: https://sawdustgirl.com/how-to-plan-and-design-a-built-in-closet/
Postar um comentário for "How to Draw a Closet in Plan"